How to Beat the Master Easy Fallout
10. Killing the Master (Hard Way)
So you want to kill the Master and all 10 of his bodyguards to complete the final battle 100% at Level 1? It won't be easy, but it is possible. This section gives a complete walkthrough on how it can be done.
This section is longer and more complex than the previous sections. It's divided into 3 parts:
A. Areas/Hexes
B. Strategy
C. Mutants
A. Areas/Hexes
There are 3 main areas: the corridor, the bend, and the pillar. The corridor is where the mutants end turn 1. The bend is the turn at the corner, where the mutants end turn 2. The pillar provides cover from fire, and where the mutants end turn 3. When ranged mutants reach the pillar, they have LoS and will shoot you.
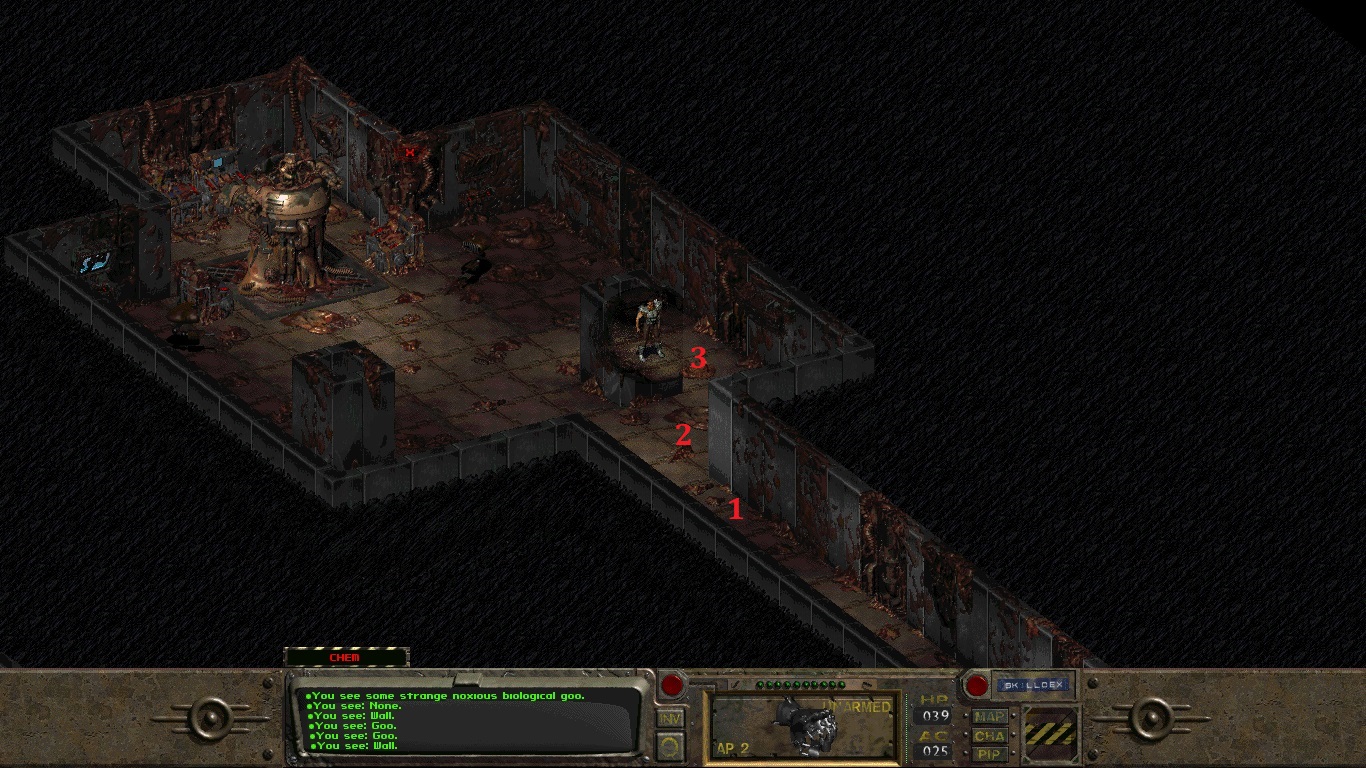
The main areas: The corridor [1], the bend [2], and the pillar [3]
There are 3 key hexes: the cover hex, the melee hex [1], and the grenade hex.
- The cover hex is the same as the Master fight.
- The melee hex is one hex to the bottom-left of the cover hex. It is where you stand to be in melee range of the mutants at the pillar.
- The grenade hex is one hex to the bottom-right of the melee hex. This is where you have LoS to throw grenades at mutants in the bend.

The melee hex [1] is one hex to the bottom-left of the goop ball
Due to Fallout's glitchy engine, ranged mutants in the corridor have LoS on you on the melee hex, but not on the cover and grenade hexes. When standing on the melee hex, you will get shot at.
B. Strategy
There are 10 super mutants which spawn every other turn. The mutants have 3 spawning sequences. This strategy is based on spawn sequence #1. In the Mutant section, there is a table listing all the mutants in sequence #1.
Before the fight: From the Master's chamber, use the elevator to go to floor 1, then back to floor 3. This loads sequence #1. Don't go to floor 2 or the mutants will spawn out of order. If you mess up, load the clean save from the Cathedral.
THE BASIC FORMULA
Step 1
. When a mutant spawns (turn 1): stand on the cover hex while they are in the corridor.
Step 2. When they reach the bend (turn 2): move to the grenade hex, throw 1-2 grenades, then move to the melee hex before ending your turn.
Step 3. When they reach the pillar (turn 3): punch 3-4 times with the power fist to kill them, then return to the the cover hex before ending your turn.
Step 4. Repeat.
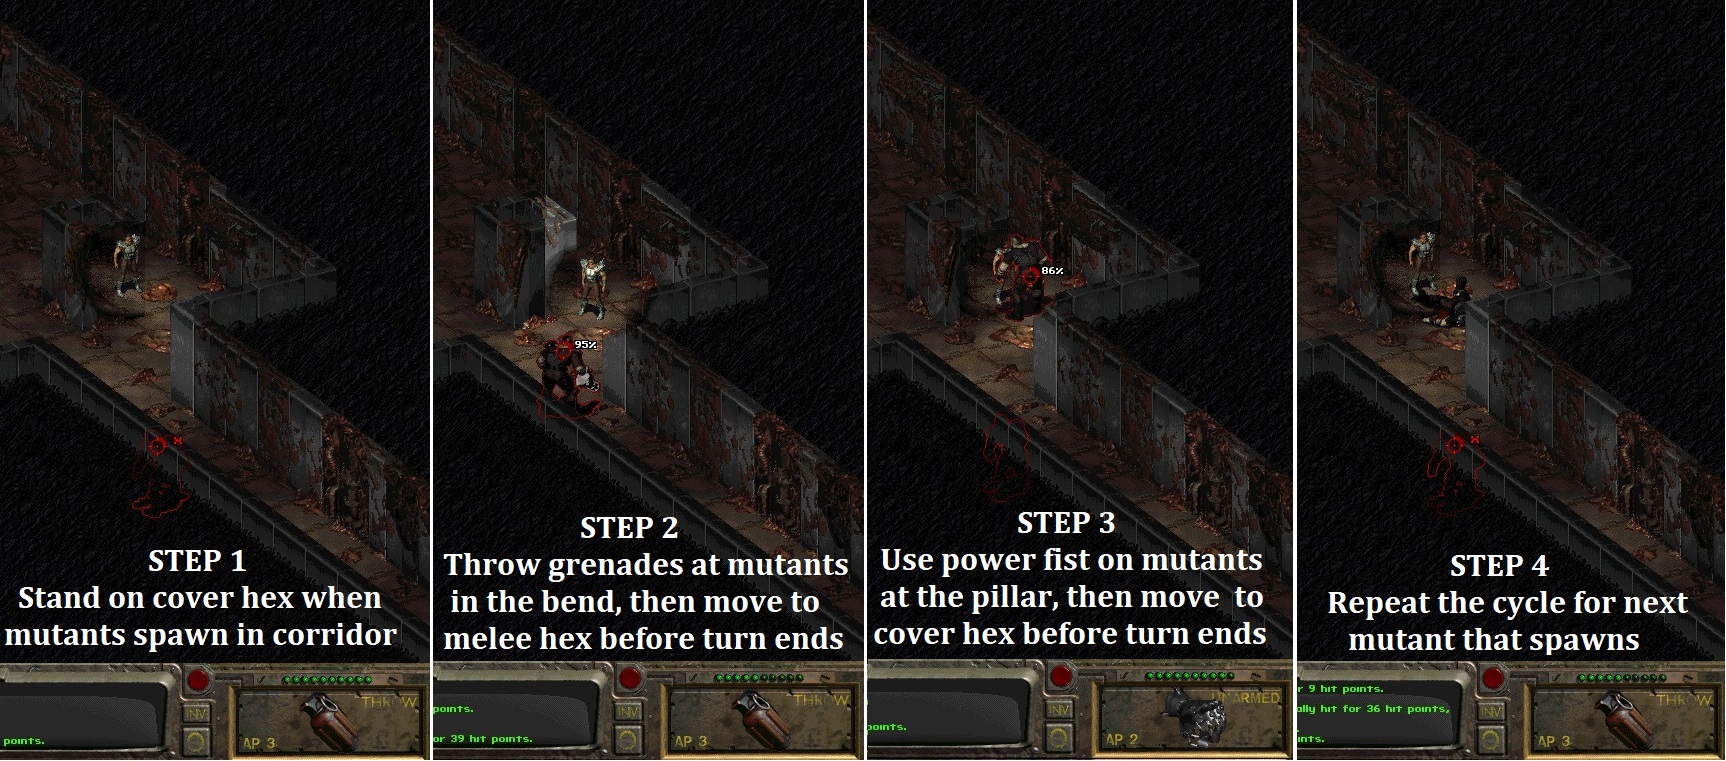
► The goal is to soften their HP with grenades so you can kill them with 3-4 punches when they reach the pillar, and have 2 AP remaining to move back to the cover hex.
VARIABLES IN THE FORMULA
There are several variables which can disrupt the formula:
- The AI and pathfinding for mutants is determined by your location.
- If you stand on the cover hex, both ranged & melee mutants move to a LoS hex in the bend. This is the "good spot". You want them to be in the good spot.
- If you stand on the melee hex, ranged mutants in the corridor will shoot you, and melee/flamethrower mutants move to a "bad spot," where there's no LoS for grenades.
► If you are stuck on the melee hex at the end of your turn, it causes a logjam effect. You must return to the cover hex to keep the cycle running smoothly.
If the strategy sounds complicated, don't worry. After a couple practice runs, everything will be much clearer.
C. Mutants
The basic formula works great for all mutants
except Mutant #1.
Mutant #1 is a tank that has 120 -140HP and 2 stimpacks; you need special tactics to kill him. Luckily, he's the only one. With grenades and the power fist, there are 7-8 ways to do this. Statistically, however, only 2 ways are reliable.
The easy method is throwing 3 grenades and hoping you crit for lethal damage.
Method #1. Hit the Master with a pulse grenade to begin combat, equip the plasma grenades and power fist, then wait behind the pillar for Mutant #1 to spawn. When he reaches the bend, throw a grenade→move to the cover hex→end turn. He will move to the pillar. Step backwards one hex→throw 2 grenades→return to the cover hex.Throwing one grenade in the first attack prevents him from healing (unless it crits) so that he moves to the pillar and you can throw 2 more. You have
3 chances to land a crit before he uses a stimpack to heal (which creates a logjam).This method is easiest, but works only 40% of the time (8/20 tries).
The consistent method is to find the melee/grenade hex (MGH) which is in the bend [1], 1 hex to the bottom-left of the flesh colored goop "pancake." The MGH gives both LoS to throw grenades at Mutant #1 after his 1st turn ends, and proximity to melee attack after his 2nd turn ends.
Method 2. Hit the Master with a pulse grenade to begin combat, equip the plasma grenades and power fist. Mutant #1 spawns and moves into corridor. Move to a cover hex in bend→end turn. Mutant #1 moves to bend. Move onto MGH→throw 3 plasma grenades. If he doesn't die and you do ≥ 27 dmg/grenade, then: he will use both stimpacks directly the MGH. Punch him 3-5 times to kill him.This method is complex, but works 85% of the time (17/20 tries).

The melee/grenade hex[1] is one hex to the bottom-left of the goop pancake in the bend
After mutant #1 is dead, hit mutant #2 in the bend with a grenade then move to the cover hex (he is melee and follows you). From this point forward, the formula works consistently.
That wasn't too complicated, was it? ... But you said the hard way, not the EZ Cheezy way. *Sigh* ... people are hard to please.
Table of Master's Soldiers (Sequence #1)
The table below has info on all mutants for sequence #1. # Grenades column indicates how many grenades are needed to throw. If you want, you can use frag grenades on Mutants #9 and 10.
#
Weapon
HP
Stims
# Grenades
Risk*
1
Gatling
120 or 140
2
3
Med
2
P. Fist
60
0
1
Med
3
Minigun
80 or 90
0
2
High
4
Laser
60
0
1
Low
5
Flamer
60
0
1
High
6
Plasma
70
0
1
Low
7
Laser
70 or 80
0
1
Low
8
Plasma
90 or 100
0
1-2
Low
9
P. Fist
70
0
0-1
Med
10
P. Fist
60 or 70
0
0-1
Med
Note: HP for some mutants is 1 of 2 possible values and chosen randomly
*Risk factor is based on the DT/DR values of the Tesla armor. It has 90% DR for energy weapons, so laser/plasma rifles are low risk. Big guns can kill you in a single shot and so are high risk Melee mutants do 10-14 damage, but can attack 3 times/turn, so use stimpacks and be cautious. The gatling laser is only deadly in close range and if it crits.
Source: https://steamcommunity.com/sharedfiles/filedetails/?id=1672756280
ارسال یک نظر for "How to Beat the Master Easy Fallout"